CODE | SD Card Information Basic - Arduino Project 042
Arduino Programming Basic -- Reading and Writing to an SD Card
SD cards have non-volatile flash memory capable of writing at 16 MB/s and having capacities up to hundreds of GB.
Flash memory is written and erased in large blocks, not a byte at a time. Flash memory can only go through about 10,000 write/erase cycles before it wears out. Although this is a known limitation, it is not usually a problem since this is equivalent to writing and erasing the entire card’s contents once a day, every day for 27 years.
Flash memory is made from millions of floating gate MOSFET transistors and has no moving parts. Its main advantage over EEPROM is the amount of memory per given size.
SD cards use a computer file system architecture called FAT, which stands for File Allocation Table. FAT16 is for cards up to 2GB and FAT32 is for greater than 2GB. To know what yours is, insert the SD card into the card slot on your computer and in Explorer, right-click and choose ‘Properties’. This will tell you what file system is your card using. Another older option was NTFS but this was for older drives that can be split into partitions.
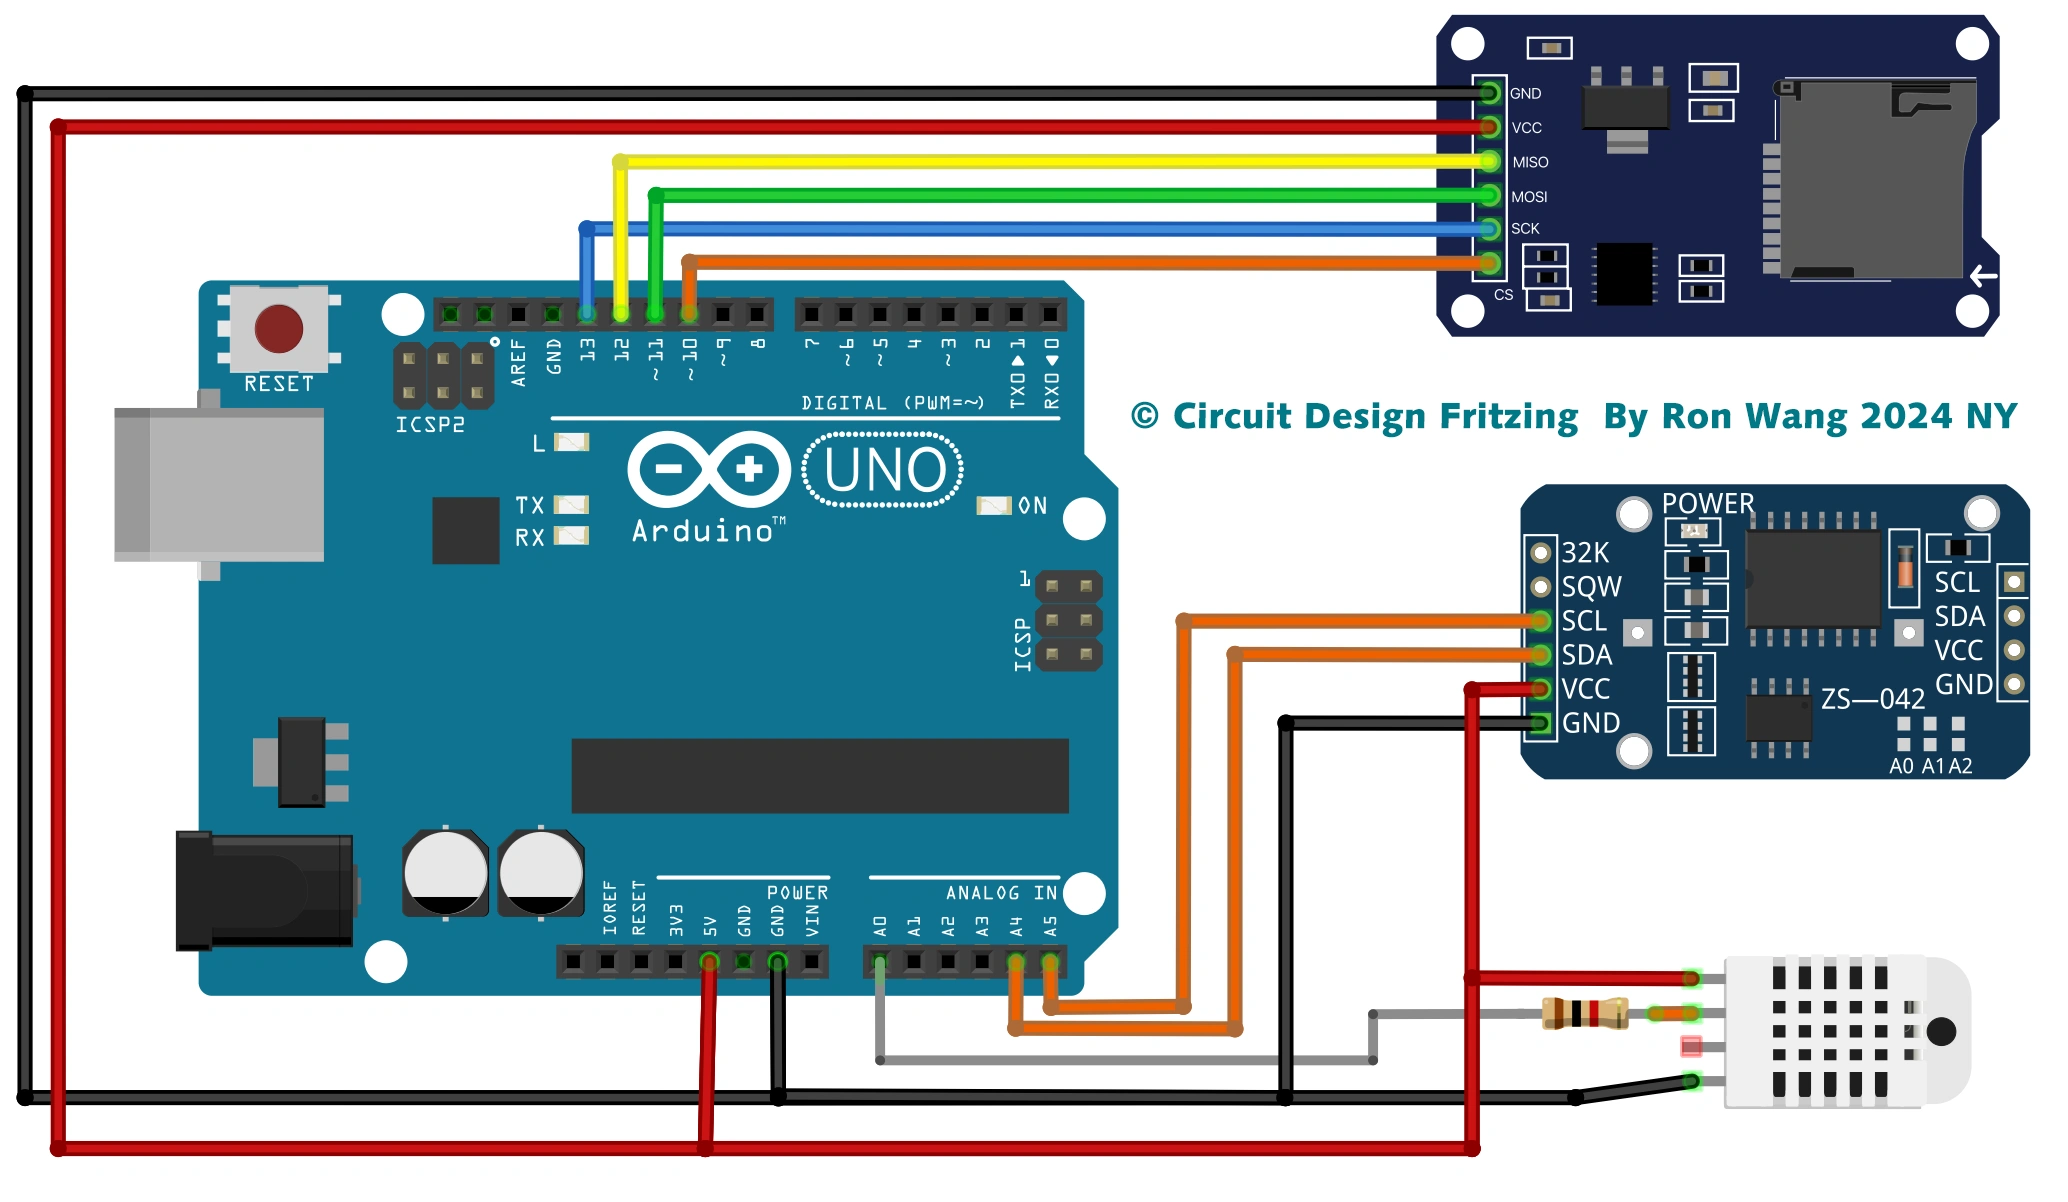
Project 42A SD Card Information

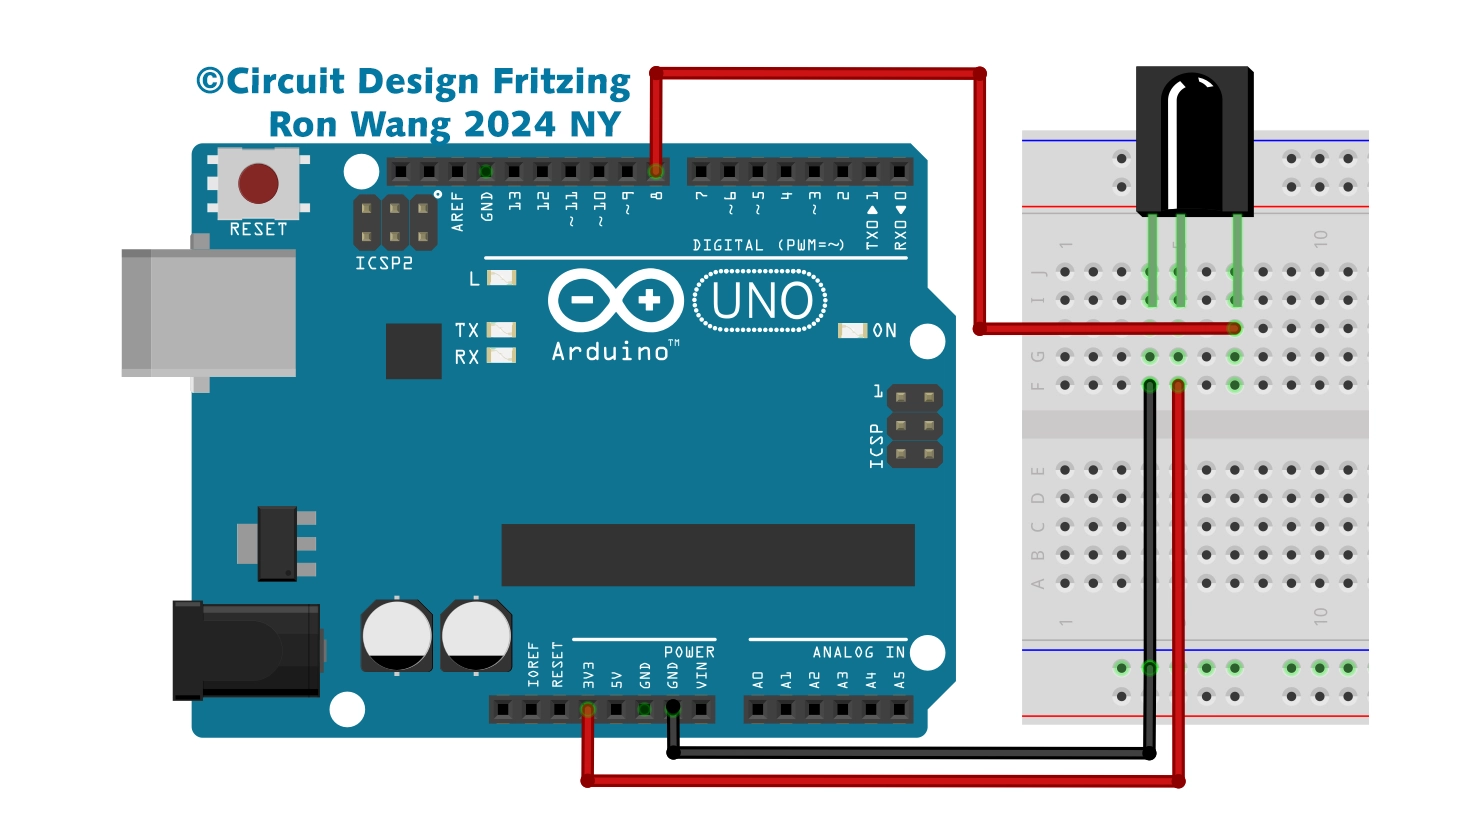
Arduino SD Card Test Circuit

Arduino SD Card Test Schematic
/* Coding Ron Wang
   Dec.10th 2024
   Autaba provides Hardware support for the project
   © Schematic Design Fritzing By Ron Wang 2024 NY
   © Circuit Design Fritzing By Ron Wang 2024 NY
  Project 42 SD Card Test Information

  This example shows how use the utility libraries on which the
  SD library is based in order to get info about your SD card.
  Very useful for testing a card when you're not sure whether its working or not.
  Pin numbers reflect the default SPI pins for Uno and Nano models.
*/

// include the SD library:
#include <SPI.h>
#include <SD.h>

// set up variables using the SD utility library functions:
Sd2Card card;
SdVolume volume;
SdFile root;
const int chipSelect = 10;

void setup() {
  // Open serial communications and wait for port to open:
  Serial.begin(9600);
  while (!Serial) {
    ; // wait for serial port to connect. Needed for native USB port only
  }


  Serial.print("\nInitializing SD card...");

  // we'll use the initialization code from the utility libraries
  // since we're just testing if the card is working!
  if (!card.init(SPI_HALF_SPEED, chipSelect)) {
    Serial.println("initialization failed. Things to check:");
    Serial.println("* is a card inserted?");
    Serial.println("* is your wiring correct?");
    Serial.println("* did you change the chipSelect pin to match your shield or module?");
    Serial.println("Note: press reset button on the board and
    reopen this Serial Monitor after fixing your issue!");
    while (1);
  } else {
    Serial.println("Wiring is correct and a card is present.");
  }

  // print the type of card
  Serial.println();
  Serial.print("Card type:         ");
  switch (card.type()) {
    case SD_CARD_TYPE_SD1:
      Serial.println("SD1");
      break;
    case SD_CARD_TYPE_SD2:
      Serial.println("SD2");
      break;
    case SD_CARD_TYPE_SDHC:
      Serial.println("SDHC");
      break;
    default:
      Serial.println("Unknown");
  }

  // Now we will try to open the 'volume'/'partition' - it should be FAT16 or FAT32
  if (!volume.init(card)) {
    Serial.println("Could not find FAT16/FAT32 partition.\nMake sure you've formatted the card");
    while (1);
  }

  Serial.print("Clusters:          ");
  Serial.println(volume.clusterCount());
  Serial.print("Blocks x Cluster:  ");
  Serial.println(volume.blocksPerCluster());

  Serial.print("Total Blocks:      ");
  Serial.println(volume.blocksPerCluster() * volume.clusterCount());
  Serial.println();

  // print the type and size of the first FAT-type volume
  uint32_t volumesize;
  Serial.print("Volume type is:    FAT");
  Serial.println(volume.fatType(), DEC);

  volumesize = volume.blocksPerCluster();    // clusters are collections of blocks
  volumesize *= volume.clusterCount();       // we'll have a lot of clusters
  volumesize /= 2;     // SD card blocks are always 512 bytes (2 blocks are 1 KB)
  Serial.print("Volume size (KB):  ");
  Serial.println(volumesize);
  Serial.print("Volume size (MB):  ");
  volumesize /= 1024;
  Serial.println(volumesize);
  Serial.print("Volume size (GB):  ");
  Serial.println((float)volumesize / 1024.0);

  Serial.println("\nFiles found on the card (name, date and size in bytes): ");
  root.openRoot(volume);

  // list all files in the card with date and size
  root.ls(LS_R | LS_DATE | LS_SIZE);
  root.close();
}

void loop(void) {
}
Project 42 Simple SD Card Read and Write
/* Coding Ron Wang
   Nov.29th 2024
   Autaba support for coding hardware
   Project 42 SD Card Read and Write
 */
#include <SPI.h>
#include <SD.h>
File myFile;
// change this to match your SD shield or module;
const int chipSelect = 10;
void setup()
{
  // Open serial communications and wait for port to open:
  Serial.begin(9600);
  while (!Serial) {
    ; // wait for serial port to connect. Needed for Leonardo only
  }
  Serial.print("Initializing SD card...");
  if (!SD.begin()) {
    Serial.println("initialization failed!");
    return;
  }
  Serial.println("initialization done.");
  // open the file. note that only one file can be open at a time,
  // so you have to close this one before opening another.
  myFile = SD.open("test.txt", FILE_WRITE);
  // if the file opened okay, write to it:
  if (myFile) {
    Serial.print("Writing to test.txt...");
    myFile.println("testing 1, 2, 3.");
    // close the file:
    myFile.close();
    Serial.println("done.");
  } else {
    // if the file didn't open, print an error:
    Serial.println("error opening test.txt");
  }
  // re-open the file for reading:
  myFile = SD.open("test.txt");
  if (myFile) {
    Serial.println("test.txt:");
    // read from the file until there's nothing else in it:
    while (myFile.available()) {
      Serial.write(myFile.read());
    }
    // close the file:
    myFile.close();
  } else {
    // if the file didn't open, print an error:
    Serial.println("error opening test.txt");
  }
}
void loop()
{
  // nothing happens after setup
}