CODE | IR Remote Control Light - Arduino Project 050
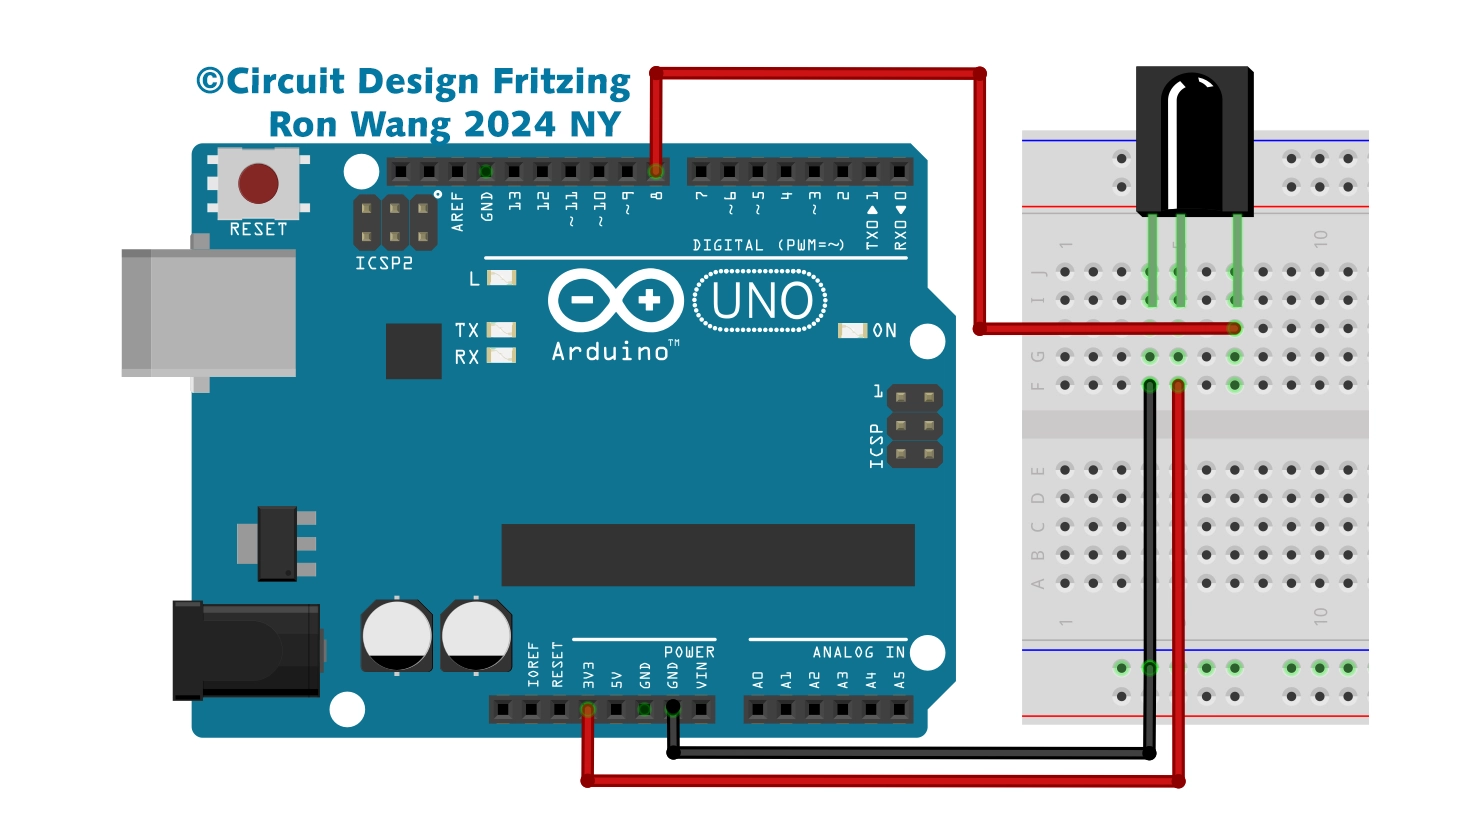
An IR remote and receiver communicate with each other by transmitting and decoding a signal in the form of pulsed IR radiation.

Sent and detected signal by IR transmitter (left) and receiver (right) (Source: SB-Projects)
Infrared radiation (IR), or infrared light, is a type of electromagnetic radiation with wavelengths ranging from 700 nm to 1 mm. Because humans can only see light with wavelengths of roughly 400 (violet) to 700 (red) nanometers, IR radiation is invisible to the human eye.
Project 50 IR Remote Control Light


/* Project 50 IR Remote Control Light
 * Coding by Ronwang
 * This example code is in the public domain
 * Hardware Support by Autaba Website :https://www.autabaec.com
 */
#include <DIYables_IRcontroller.h> // Added DIYables_IRcontroller library
#define IR_RECEIVER_PIN 8 // The Arduino pin connected to IR controller
int RedPin = 2;
int BluePin = 3;
int YellowPin = 4;
DIYables_IRcontroller_17 irController(IR_RECEIVER_PIN, 200); // debounce time is 200ms
void setup() {
  Serial.begin(9600);
  irController.begin();
  pinMode(RedPin, OUTPUT);      // sets the digital pin as output
  pinMode(BluePin, OUTPUT);      // sets the digital pin as output
  pinMode(YellowPin, OUTPUT);      // sets the digital pin as output
}
void loop() {
  Key17 key = irController.getKey();
  if (key != Key17::NONE) {
    switch (key) {
      case Key17::KEY_1:
       Serial.println("1");
       digitalWrite(RedPin, HIGH);
        // TODO: YOUR CONTROL
        break;
      case Key17::KEY_2:
        Serial.println("2");
        digitalWrite(BluePin, HIGH);
        // TODO: YOUR CONTROL
        break;
      case Key17::KEY_3:
        Serial.println("3");
        digitalWrite(YellowPin, HIGH);
        // TODO: YOUR CONTROL
        break;
      case Key17::KEY_4:
        Serial.println("4");
        // TODO: YOUR CONTROL
        break;
      case Key17::KEY_5:
        Serial.println("5");
        // TODO: YOUR CONTROL
        break;
      case Key17::KEY_6:
        Serial.println("6");
        // TODO: YOUR CONTROL
        break;
      case Key17::KEY_7:
        Serial.println("7");
        // TODO: YOUR CONTROL
        break;
      case Key17::KEY_8:
        Serial.println("8");
        // TODO: YOUR CONTROL
        break;
      case Key17::KEY_9:
        Serial.println("9");
        // TODO: YOUR CONTROL
        break;
      case Key17::KEY_STAR:
        Serial.println("*");
        // TODO: YOUR CONTROL
        break;
      case Key17::KEY_0:
        Serial.println("0");
        digitalWrite(RedPin, LOW);
        digitalWrite(BluePin, LOW);
        digitalWrite(YellowPin, LOW);
        // TODO: YOUR CONTROL
        break;
      case Key17::KEY_SHARP:
        Serial.println("#");
        // TODO: YOUR CONTROL
        break;
      case Key17::KEY_UP:
        Serial.println("UP");
        // TODO: YOUR CONTROL
        break;
      case Key17::KEY_DOWN:
        Serial.println("DOWN");
        // TODO: YOUR CONTROL
        break;
      case Key17::KEY_LEFT:
        Serial.println("LEFT");
        // TODO: YOUR CONTROL
        break;
      case Key17::KEY_RIGHT:
        Serial.println("RIGHT");
        // TODO: YOUR CONTROL
        break;
      case Key17::KEY_OK :
        Serial.println("OK");
        // TODO: YOUR CONTROL
        break;
      default:
        Serial.println("WARNING: undefined key:");
        break;

    }
  }
}