CODE | Piezo Knock Sensor - Arduino Project 013
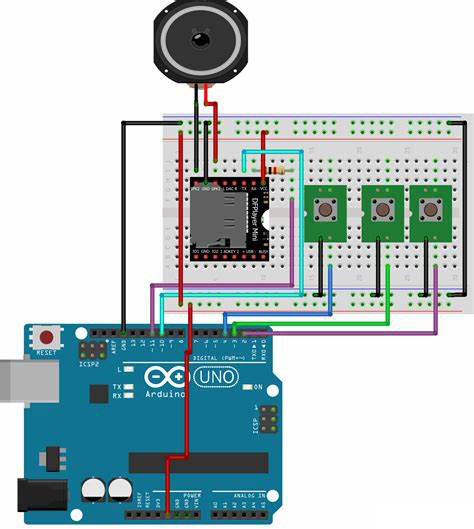
A piezo disc works when an electric current is passed over the ceramic material in the disc, causing it to change shape and hence make a sound (a click). The disc also works in reverse: when the disc is knocked or squeezed, the force on the material causes the generation of an electric current. You can read that current using the Arduino and you are going to do that now by making a Knock Sensor.
项目Project 13 Piezo Knock Sensor 压电振动传感器
/* Coding Ron Wang
   Aug.13rd 2024
   Autaba support for coding hardware
 */
// Project 13 - Piezo Knock Sensor
int ledPin = 9; // LED on Digital Pin 9
int piezoPin = 5; // Piezo on Analog Pin 5
int threshold = 120; // The sensor value to reach before activation
int sensorValue = 0; // A variable to store the value read from the sensor
float ledValue = 0; // The brightness of the LED
void setup() {
 pinMode(ledPin, OUTPUT); // Set the ledPin to an OUTPUT
 // Flash the LED twice to show the program has started
 digitalWrite(ledPin, HIGH); delay(150); digitalWrite(ledPin, LOW); delay(150);
 digitalWrite(ledPin, HIGH); delay(150); digitalWrite(ledPin, LOW); delay(150);
}
void loop() {
 sensorValue = analogRead(piezoPin); // Read the value from the sensor
 if (sensorValue >= threshold) { // If knock detected set brightness to max
 ledValue = 255;
 }
 analogWrite(ledPin, int(ledValue) ); // Write brightness value to LED
 ledValue = ledValue - 0.05; // Dim the LED slowly
 if (ledValue <= 0) { ledValue = 0;} // Make sure value does not go below zero
}