CODE | Dot Matrix Display Beat Heart - Valentine's Day Gift
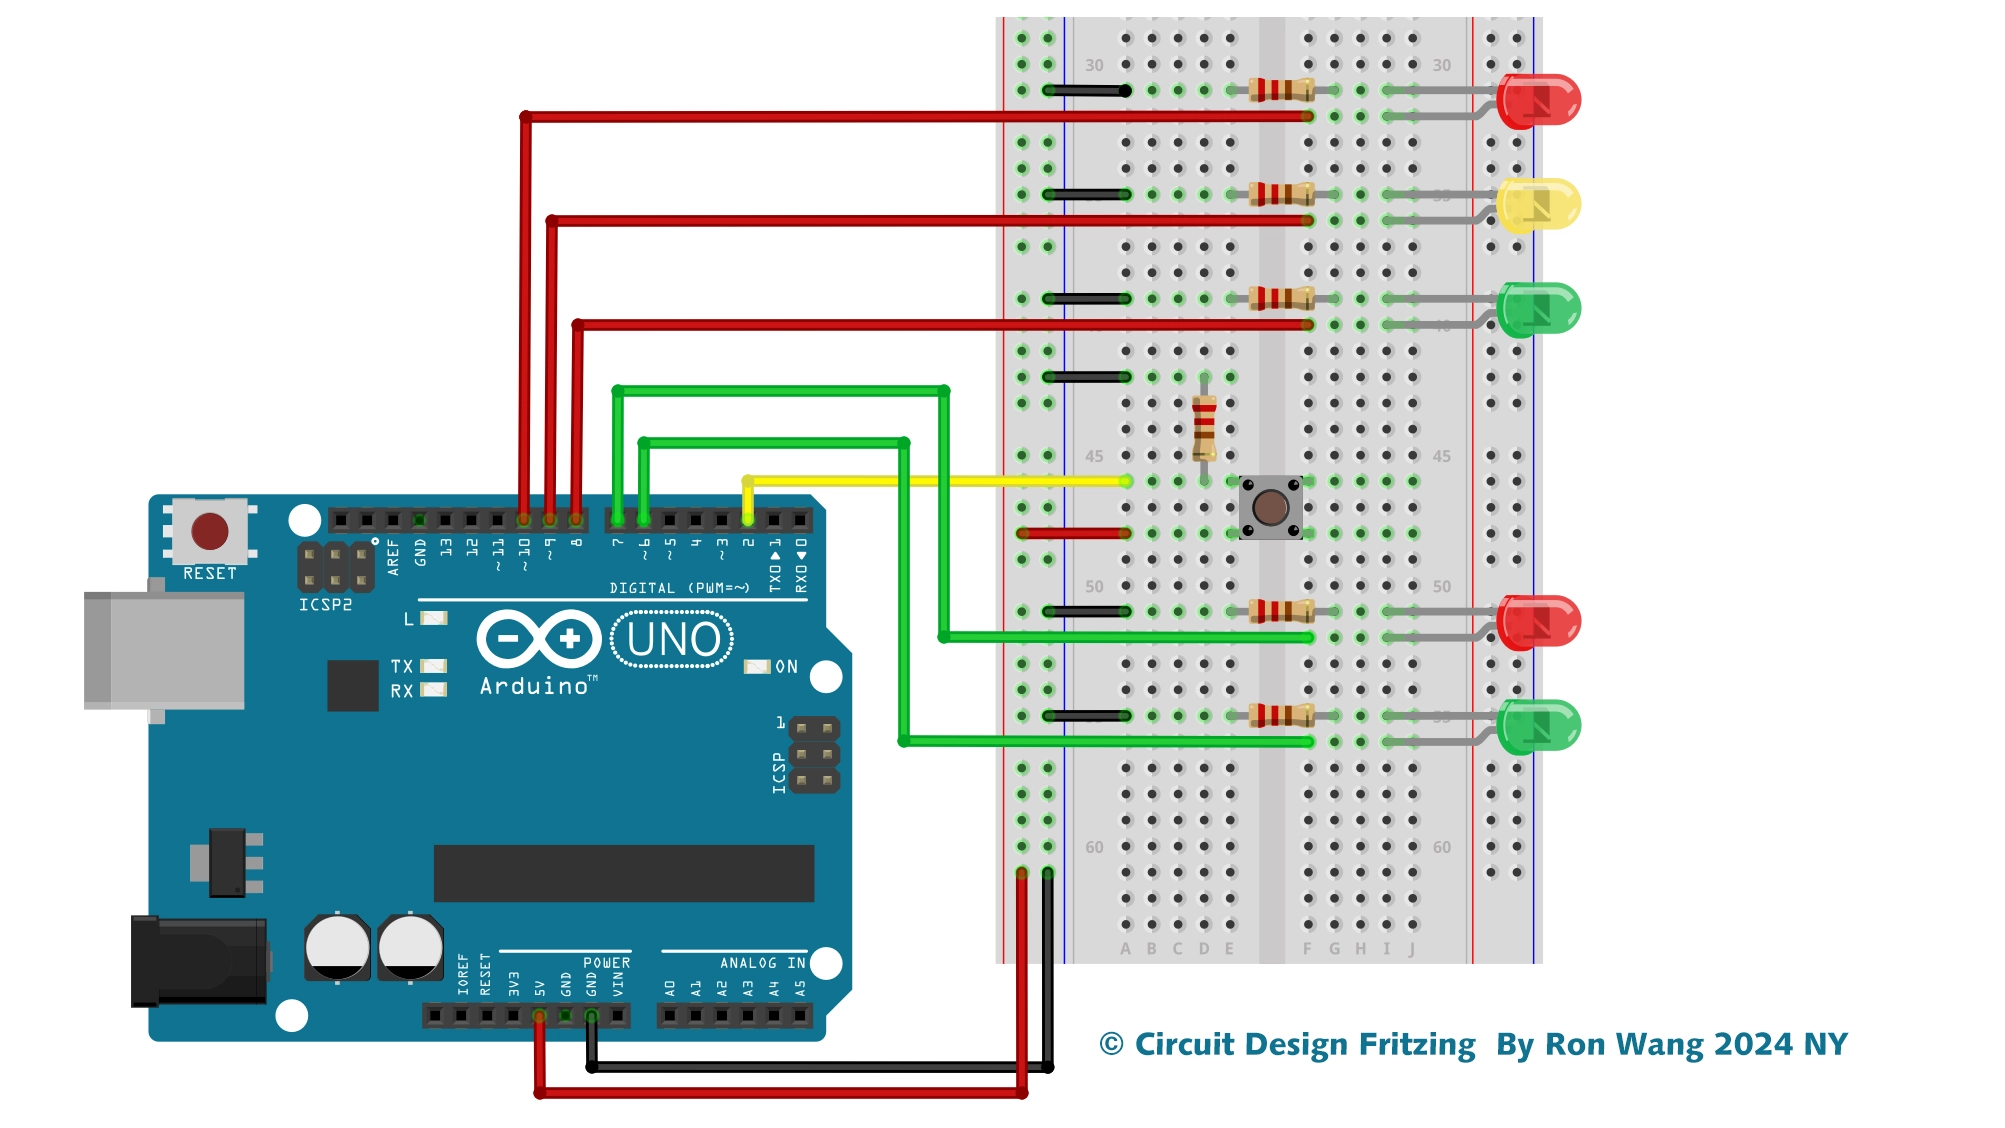
You’re going to use the Project 19 circuit, but with a slight variation in the code to create a multi-frame animation that also scrolls from right to left. In doing so, you will be introduced to the concept of multidimensional arrays. You’ll also learn a little trick to get bitwise rotation (or circular shift). To start, you'll use the exact same circuit as in Project 19.
Valentine's Day Gift Red Beating Heart – LED Dot Matrix Display
/* Coding Ron Wang
   Feb.14th 2024
   Autaba support for coding hardware
   LED Dot Matrix – Beating Heat
 */
int ANIMDELAY = 100;  // animation delay, deafault value is 100
int INTENSITYMIN = 0; // minimum brightness, valid range [0,15]
int INTENSITYMAX = 8; // maximum brightness, valid range [0,15]

int DIN_PIN = 11;      // data in pin
int CS_PIN = 8;       // load (CS) pin
int CLK_PIN = 12;      // clock pin

// MAX7219 registers
byte MAXREG_DECODEMODE = 0x09;
byte MAXREG_INTENSITY  = 0x0a;
byte MAXREG_SCANLIMIT  = 0x0b;
byte MAXREG_SHUTDOWN   = 0x0c;
byte MAXREG_DISPTEST   = 0x0f;

const unsigned char heart[] =
{
  B01100110,
  B11111111,
  B11111111,
  B11111111,
  B01111110,
  B00111100,
  B00011000,
  B00000000
};


void setup ()
{
  pinMode(DIN_PIN, OUTPUT);
  pinMode(CLK_PIN, OUTPUT);
  pinMode(CS_PIN, OUTPUT);

  // initialization of the MAX7219
  setRegistry(MAXREG_SCANLIMIT, 0x07);
  setRegistry(MAXREG_DECODEMODE, 0x00);  // using an led matrix (not digits)
  setRegistry(MAXREG_SHUTDOWN, 0x01);    // not in shutdown mode
  setRegistry(MAXREG_DISPTEST, 0x00);    // no display test
  setRegistry(MAXREG_INTENSITY, 0x0f & INTENSITYMIN);

  // draw hearth
  setRegistry(1, heart[0]);
  setRegistry(2, heart[1]);
  setRegistry(3, heart[2]);
  setRegistry(4, heart[3]);
  setRegistry(5, heart[4]);
  setRegistry(6, heart[5]);
  setRegistry(7, heart[6]);
  setRegistry(8, heart[7]);
}

void loop ()
{
  // second beat
  setRegistry(MAXREG_INTENSITY, 0x0f & INTENSITYMAX);
  delay(ANIMDELAY);

  // switch off
  setRegistry(MAXREG_INTENSITY, 0x0f & INTENSITYMIN);
  delay(ANIMDELAY);

  // second beat
  setRegistry(MAXREG_INTENSITY, 0x0f & INTENSITYMAX);
  delay(ANIMDELAY);

  // switch off
  setRegistry(MAXREG_INTENSITY, 0x0f & INTENSITYMIN);
  delay(ANIMDELAY*6);
}

void setRegistry(byte reg, byte value)
{
  digitalWrite(CS_PIN, LOW);

  putByte(reg);   // specify register
  putByte(value); // send data

  digitalWrite(CS_PIN, LOW);
  digitalWrite(CS_PIN, HIGH);
}

void putByte(byte data)
{
  byte i = 8;
  byte mask;
  while (i > 0)
  {
    mask = 0x01 << (i - 1);        // get bitmask
    digitalWrite( CLK_PIN, LOW);   // tick
    if (data & mask)               // choose bit
      digitalWrite(DIN_PIN, HIGH); // send 1
    else
      digitalWrite(DIN_PIN, LOW);  // send 0
    digitalWrite(CLK_PIN, HIGH);   // tock
    --i;                           // move to lesser bit
  }
}

Valentine's Day Gift Animation Heart – LED Dot Matrix Display
/* Coding Ron Wang
   Feb.14th 2024
   Autaba support for coding hardware
   LED Dot Matrix – Animation Heart
 */
unsigned char i;
unsigned char j;

int Max7219_pinCLK = 11;
int Max7219_pinCS = 10;
int Max7219_pinDIN = 12;

unsigned char disp1[19][8]={
  0x00, 0x00, 0x00, 0x00, 0x00, 0x00, 0x00, 0x00, // Heart Pattern
  0x00, 0x00, 0x00, 0x00, 0x40, 0x00, 0x00, 0x00,
  0x00, 0x00, 0x00, 0x40, 0x40, 0x00, 0x00, 0x00,
  0x00, 0x00, 0x80, 0x40, 0x40, 0x00, 0x00, 0x00,
  0x00, 0x80, 0x80, 0x40, 0x40, 0x00, 0x00, 0x00,
  0x40, 0x80, 0x80, 0x40, 0x40, 0x00, 0x00, 0x00,
  0x60, 0x80, 0x80, 0x40, 0x40, 0x00, 0x00, 0x00,
  0x60, 0x90, 0x80, 0x40, 0x40, 0x00, 0x00, 0x00,
  0x60, 0x90, 0x88, 0x40, 0x40, 0x00, 0x00, 0x00,
  0x60, 0x90, 0x88, 0x44, 0x40, 0x00, 0x00, 0x00,
  0x60, 0x90, 0x88, 0x44, 0x44, 0x00, 0x00, 0x00,
  0x60, 0x90, 0x88, 0x44, 0x44, 0x08, 0x00, 0x00,
  0x60, 0x90, 0x88, 0x44, 0x44, 0x08, 0x10, 0x00,
  0x60, 0x90, 0x88, 0x44, 0x44, 0x08, 0x10, 0x20,
  0x60, 0x90, 0x88, 0x44, 0x44, 0x08, 0x10, 0x60,
  0x60, 0x90, 0x88, 0x44, 0x44, 0x08, 0x90, 0x60,
  0x60, 0x90, 0x88, 0x44, 0x44, 0x88, 0x90, 0x60, // Heart Pattern

};

void Write_Max7219_byte(unsigned char DATA)
{
  unsigned char i;
  digitalWrite(Max7219_pinCS,LOW);
  for(i=8;i>=1;i--)
  {
    digitalWrite(Max7219_pinCLK,LOW);
    digitalWrite(Max7219_pinDIN,DATA&0x80);
    DATA = DATA<<1;
    digitalWrite(Max7219_pinCLK,HIGH);
  }
}

void Write_Max7219(unsigned char address,unsigned char dat)
{
  digitalWrite(Max7219_pinCS,LOW);
  Write_Max7219_byte(address);
  Write_Max7219_byte(dat);
  digitalWrite(Max7219_pinCS,HIGH);
}

void Init_MAX7219(void)
{
  Write_Max7219(0x09, 0x00);
  Write_Max7219(0x0a, 0x03);
  Write_Max7219(0x0b, 0x07);
  Write_Max7219(0x0c, 0x01);
  Write_Max7219(0x0f, 0x00);
}

void setup()
{

  pinMode(Max7219_pinCLK,OUTPUT);
  pinMode(Max7219_pinCS,OUTPUT);
  pinMode(Max7219_pinDIN,OUTPUT);
  delay(50);
  Init_MAX7219();
}

void loop()
{
  for(j=0;j<19;j++)
  {
    for(i=1;i<9;i++)
      Write_Max7219(i,disp1[j][i-1]);
    delay(500);
  }
}