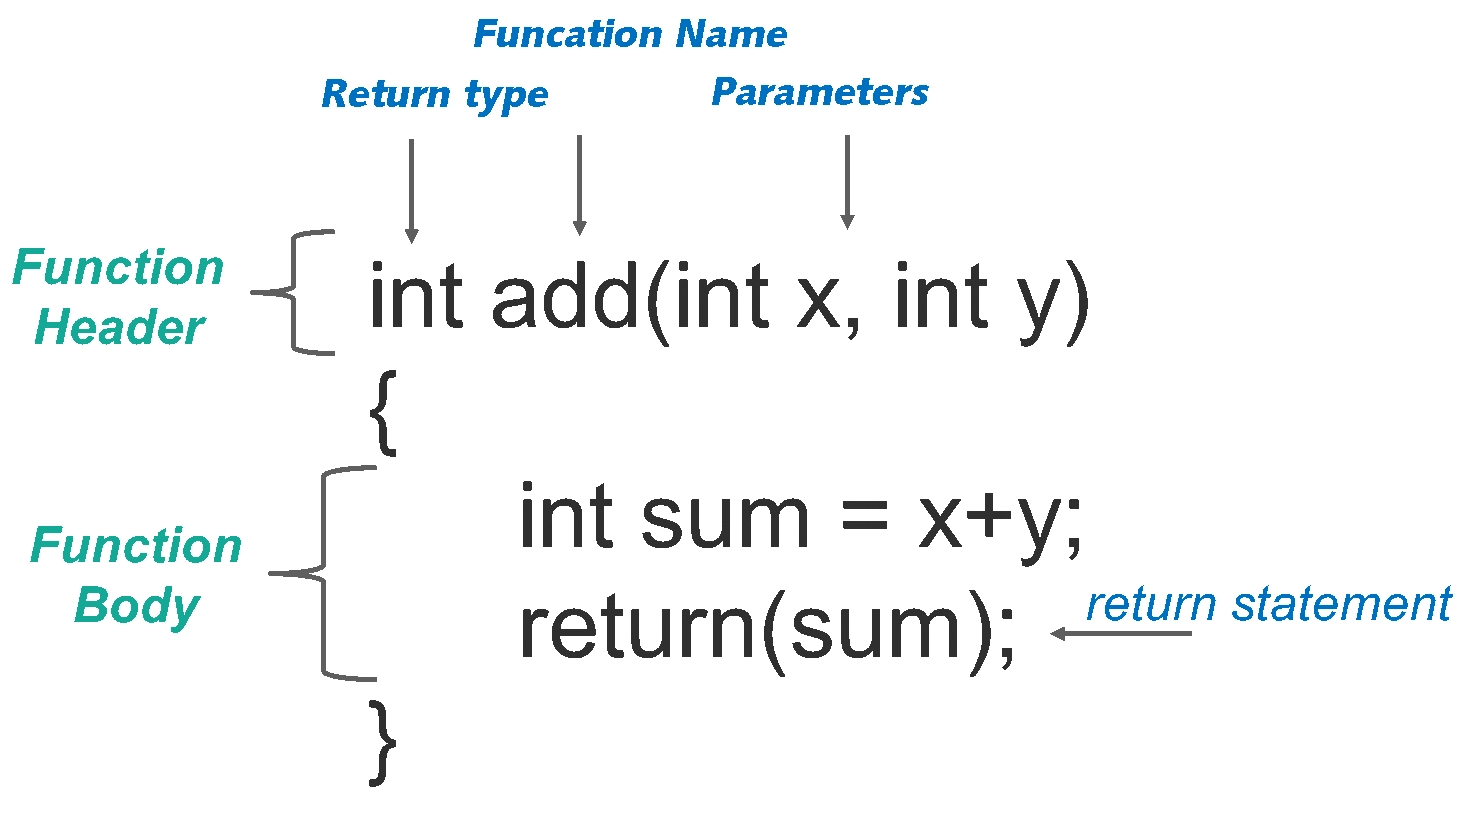
CODE | Ultrasonic Distance OLED 128x64 Display - Arduino Project 041
About the Ultrasonic sensor knowledge and infor mation click the link : Arduino Project 038 - Simple Ultrasonic Range HC-SR04
About OLED Display
Because the OLED display uses I2C communication protocol, wiring is very simple. You just need to connect to the Arduino Uno I2C pins as shown in the table below.
The OLED display doesn’t require backlight, which results in a very nice contrast in dark environments. Additionally, its pixels consume energy only when they are on, so the OLED display consumes less power when compared with other displays.
The model we’re using here has only four pins and communicates with the Arduino using I2C communication protocol. There are models that come with an extra RESET pin. There are also other OLED displays that communicate using SPI communication.
Circuit and Schematic


Libraries
To control the OLED display you need the adafruit_SSD1306.h and the adafruit_GFX.h libraries. Follow the next instructions to install those libraries.
1. Open your Arduino IDE and go to Sketch > Include Library > Manage Libraries. The Library Manager should open.
2. Type “SSD1306” in the search box and install the SSD1306 library from Adafruit.
/* Project 41 Ultrasonic Distance OLED 128X64 Display
 * Created by Ronwang
 * Hardware support by Autaba www.autabaec.com
 * Dec,6th,2024
 */
#include <Wire.h>
#include <Adafruit_GFX.h>
#include <Adafruit_SSD1306.h>
#define SCREEN_WIDTH 128 // OLED display width,  in pixels
#define SCREEN_HEIGHT 64 // OLED display height, in pixels
const int trigPin = 9; // Arduino pin connected to Ultrasonic Sensor's TRIG pin
const int echoPin = 8; // Arduino pin connected to Ultrasonic Sensor's ECHO pin
float duration, distance;
Adafruit_SSD1306 oled(SCREEN_WIDTH, SCREEN_HEIGHT, &Wire, -1); // create SSD1306 display object connected to I2C
String tempString;
void setup() {
  pinMode(trigPin, OUTPUT);
  pinMode(echoPin, INPUT);
  Serial.begin(9600);
  // initialize OLED display with address 0x3C for 128x64
  if (!oled.begin(SSD1306_SWITCHCAPVCC, 0x3C)) {
    Serial.println(F("SSD1306 allocation failed"));
    while (true);
  }
  delay(2000);         // wait for initializing
  oled.clearDisplay(); // clear display
  oled.setTextSize(2);      // text size
  oled.setTextColor(WHITE); // text color
  oled.setCursor(0, 10);    // position to display
  tempString.reserve(10);   // to avoid fragmenting memory when using String
}
void loop() {
  // generate 10-microsecond pulse to TRIG pin

  digitalWrite(trigPin, LOW);
  delayMicroseconds(2);
  digitalWrite(trigPin, HIGH);
  delayMicroseconds(10);
  digitalWrite(trigPin, LOW);
  duration = pulseIn(echoPin, HIGH);
  distance = (duration*.0343)/2;  // Distance unit cm
  // print the value to Serial Monitor
  Serial.print("Distance: ");
  Serial.println(distance);
  delay(100);
  tempString  = String(distance, 2); // two decimal places
  tempString += " cm";
  Serial.println(tempString);    // print the temperature in Celsius to Serial Monitor
  oledDisplayCenter(tempString); // display temperature on OLED
}
void oledDisplayCenter(String text) {
  int16_t x1;
  int16_t y1;
  uint16_t width;
  uint16_t height;
  oled.getTextBounds(text, 0, 0, &x1, &y1, &width, &height);
  // display on horizontal and vertical center
  oled.clearDisplay(); // clear display
  oled.setCursor((SCREEN_WIDTH - width) / 2, (SCREEN_HEIGHT - height) / 2);
  oled.println(text); // text to display
  oled.display();
}