CODE | LED Traffic Light - Arduino Project 003

RonWang3 years ago (2023-05-22)电子编程 COD57

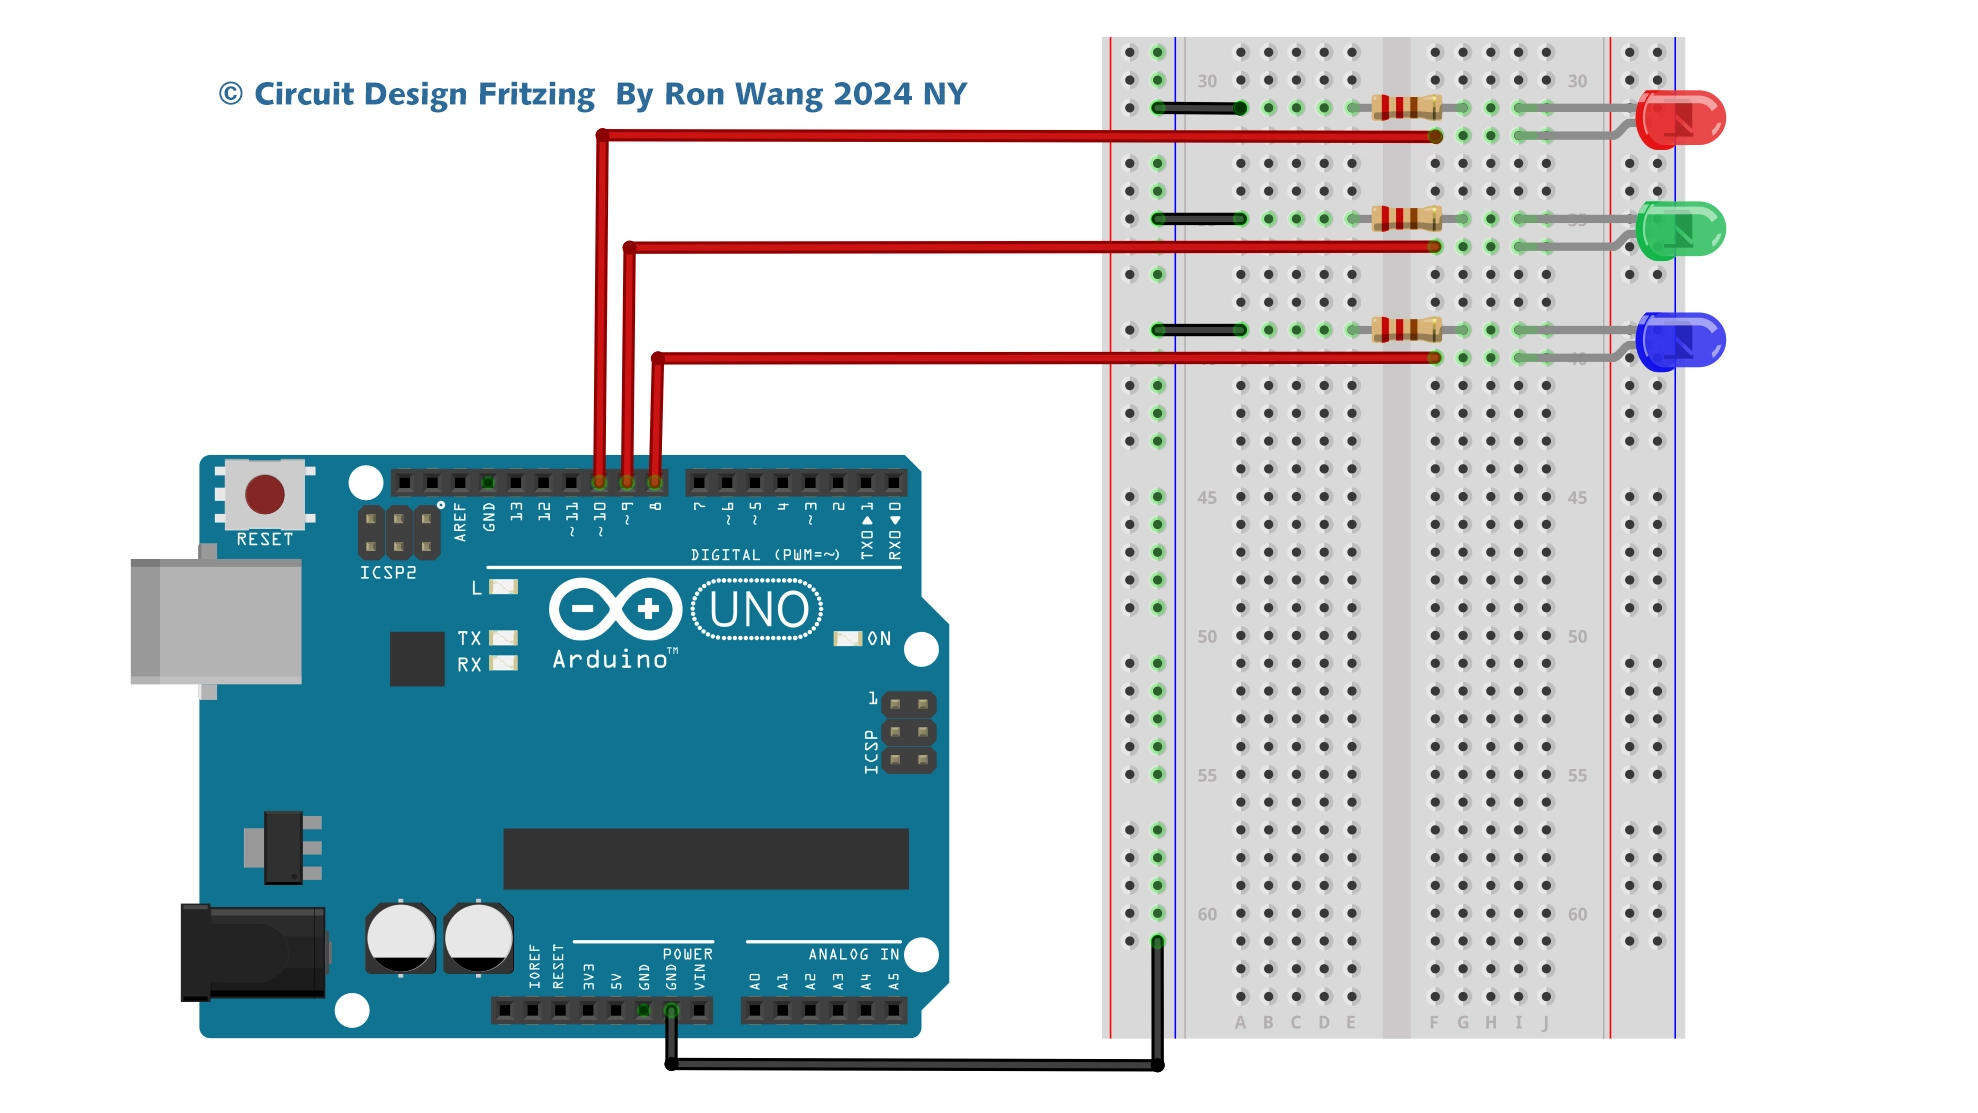
You are now going to create a set of traffic lights that will change from green to red, via amber, and back again, after a set length of time using the four-state UK system. This project could be used to make a set of working traffic lights for a model railway or for a child’s toy town. If you’re not from the UK, you can modify the code and colors to make them work like the traffic lights in your own country. First, though, make the project as it is and change it once you know how it works.

Project 3 -LED Traffic Lights

03 Traffic Light Circuit

03 Traffic Light Schematic


/* Coding Ron Wang
   June 4th 2024
   Autaba support for coding hardware
 */
// Project 3 - LED Traffic Lights

int ledDelay = 10000; // delay in between changes
int redPin = 10;
int yellowPin = 9;
int greenPin = 8;
void setup() {
 pinMode(redPin, OUTPUT);
 pinMode(yellowPin, OUTPUT);
 pinMode(greenPin, OUTPUT);
}
void loop() {
 digitalWrite(redPin, HIGH); // turn the red light on
 delay(ledDelay); // wait 5 seconds
 digitalWrite(yellowPin, HIGH); // turn on yellow
 delay(2000); // wait 2 seconds
 digitalWrite(greenPin, HIGH); // turn green on
 digitalWrite(redPin, LOW); // turn red off
 digitalWrite(yellowPin, LOW); // turn yellow off
 delay(ledDelay); // wait ledDelay milliseconds
 digitalWrite(yellowPin, HIGH); // turn yellow on
 digitalWrite(greenPin, LOW); // turn green off
 delay(2000); // wait 2 seconds
 digitalWrite(yellowPin, LOW); // turn yellow off
 // now our loop repeats
}
Share with Friends:

Related Articles

CODE | Line Following Robot - Arduino Project 030

CODE | Line Following Robot - Arduino Project 030

Project 30 Line Following RobotA line following robot is an autonomous vehicle that detects and foll…

CODE | Liquid Crystal Displays-Serial to Display - Arduino Project 023C

CODE | Liquid Crystal Displays-Serial to Display - Arduino Project 023C

Before wiring the LCD screen to your Arduino board we suggest to solder a pin header strip to the 14…

CODE | IR Remote Control Light - Arduino Project 050

CODE | IR Remote Control Light - Arduino Project 050

An IR remote and receiver communicate with each other by transmitting and decoding a signal in the f…

CODE | Serial Controlled Mood Lamp - Arduino Project 010

CODE | Serial Controlled Mood Lamp - Arduino Project 010

For Project 10, you will revisit the circuit from Project 8 — RGB Mood Lamp, but you’ll now delve in…

Electric Maker and Coding Basic Tools and Knowledge

Electric Maker and Coding Basic Tools and Knowledge

电子制作|启程前的入门知识电子制作是一件充满乐趣和成就感的活动,也许在开始时会有一些挑战或者坎坷,慢慢的当你踏入电子制作的世界之后,我相信你肯定再也停不下脚步,本部分电子制作的入门知识将主要围绕:工具…

How to use the Soldering Electric Maker Basic Technology

How to use the Soldering Electric Maker Basic Technology

如何使用电络铁?初级电子制作与维修之焊接知识Gather Tools: You will need a soldering iron, solder, a soldering iron stand,…

Post a Comment

Anonymous

Feel free to share your thoughts and opinions here.