Vehicle Stamping Line Fluid Contamination Online Monitoring Management System
汽车冲压线油液污染在线监测管理系统
摘要:设计开发了汽车冲压线液压系统油液污染检测装置,介绍了激光颗粒计数器的关键技术,检测系统的原理图、油液的回路图、系统工作的逻辑原理图、产品的外形图及系统参数的设置和测试,最后总结了该系统的应用效果。
关键词:在线颗粒检测仪,油液,污染

0 背景
汽车生产制造中冲压设备的机械化和自动化程度越来越高,而作为冲压生产线能量传递“血液”的液压油的品质对整个系统影响意义非同寻常,液压系统故障的70~80%是由流体介质污染造成。而介质污染会造成的零部件磨损、氧化、元件破坏等各种故障。通过油液污染检测、控制和净化会有效的降低元件故障率,延长设备寿命和减少生产线的停机时间。
本文将首先介绍油液在线检测技术的现状,然后详细研究汽车冲压线液压油污染在线检测系统的设计、系统核心部件在线激光颗粒检测仪的硬件构造和工作原理,随后对完成的在线检测系统进行测试和结果分析,最后得出该在线检测系统测试精确、反馈信息准确及时,达到了实时在线检测液压系统污染程度的需求。
常用的液压油污染检测的方式有在线取样离线检测、在线间断检测和在线实时检测等三种。在线实时不间断检测方式具有实时、连续、不影响系统工作的状态下反馈系统的油液状态,不但节省取样器材的设备和耗材,而且减少油液二次污染和样品污染造成的册数数据不准确等问题。
1 油液在线检测系统技术现状
液压系统油品在线检测和实时监控已经在国外普及使用,如工程机械、汽车制造、航空航天、军工等,在国内在线污染检测系统仅在军工、航天液压诊断设备的很少设备上安装,在工程机械、建筑机械、汽车制造、大型救援机器人等重要的大型设备上还很少使用。
液压油的污染检测方法有:光谱分析、激光颗粒计数、电容式和称重法等,激光源具有不受介质种类、颗粒材料光学和电学特性参数的影响,因此激光颗粒计数器是当前最先进、最精确的颗粒计数测试技术。激光粒度仪主要依据Fraunhofer衍射和Mie散射两种光学理论而设计制造的,理论指出:当光线通过不均匀介质时,会发生由于吸收、反射、折射、透射和衍射共同作用引起的偏离其直线传播方向的散射现象,散射光中包含有颗粒大小、形状、结构以及成分、组成和浓度等信息。因此,利用光散射技术可以测量颗粒的尺寸分布。图1为激光粒度仪的经典光学结构,它由发射、接受和测量窗口等三部分组成。光发射部分主要是为仪器提供单色的平行照明光。接收部分是仪器光学结构的关键。测量窗口主要是让被测样品在完全分散的状态下通过测量区,以便仪器获得样品的粒度信息。

图 激光颗粒计数器工作原理

2 油液在线检测系统设计
目前国内汽车冲压线的油液检测方法一般都采用取样后离线检测的方法来控制油液的清洁度,存在的问题是测试结果是滞后的、受检测时效等问题的影响;另外,还存在受到取样检测点、取样人员及取样设备的限制和二次污染的风险,油液状态发生变化或者变质等问题,导致测试结果不能真实反馈系统的油液状态。在线检测的系统可以实时、不停机状态下反馈系统油液清洁度的状态,还可以通过传感器等设备触发旁路过滤系统对油液进行过滤,实现油液的自动检测和过滤。

设计开发的汽车冲压线在线油液监测系统的原理如图2所示,该系统的专利号为CN201821518918。系统主要由三个部分组成,A部分是原有的液压系统,在回油路上我们增加油液污染检测系统B,同时,在液压站的邮箱部分安装独立的旁路过滤系统C,实现原有系统的最小改造,系统运行时,B部分检测工作油路的油液清洁度,当油液的清洁度超过系统设置的阈值,B部分设备指示灯会由绿色变为黄色,同时气动C部分的旁路过滤系统,直到油液的清洁度值达到预设范围,指示灯变绿,旁路过滤系统停止工作。
3 在线颗粒检测仪
3.1 液压油在线检测仪流体回路图
本系统采用的在线颗粒检测仪,设备提供的流量范围为40~140ml/min(最适宜的流量为60 ml/min),对于汽车制造冲压线大型液压站,一般流量在200-300l/min的流量范围,结合内嵌式传感器System20对流量进行扩展,根据尺寸不同提供三种尺寸规格的流量,尺寸1型,接口G3/8适用流量范围6~25 l/min, 尺寸2型,接口尺寸G3/4适用流量范围20~100 l/min,尺寸3型,接口G1-1/4,适用流量范围170~380l/min。本系统我们选择尺寸3型的传感器流量280l/min 。

系统的流体回路如图3所示,System20内嵌式传感器安装在检测的流体管路中,P1端口连接在线颗粒检测仪的“in”端口,P2端口连接至“Out端口”,在线颗粒检测仪主要由检测单元、激光源、光学扫描仪、转换阀、注射泵和流量探测装置等组成。
3.2 在线颗粒检测仪工作逻辑框图
在线颗粒检测仪工作逻辑框图,如图4所示,由激光光学扫描仪完成测试,面积计算器和无阻光计算器,参考电压发生器,实测的数据与参考数据进行比测得出计数结果,根据通道数量不同,检测不同大小的颗粒数量,进一步将计数数据通过代码转换运算,提供I/ O设备储存、显示、打印及PC接口输出。

图 4 油液在线检测仪逻辑框图
3.3 在线颗粒检测仪外形尺寸图
在线颗粒检测仪外形尺寸如图5所示,长x宽x高为182x155x86mm,总重量为1.3kg,有连个距离为60的螺栓孔固定,可以使用2只M5的六角螺栓固定在设备或者支架工位,可以根据需求水平或垂直安装。根据安装的方式不同,在设备内部设置LED显示的方向以便现场数据的读取。

图5 在线颗粒检测仪设备外形图
3.4 液压油污染在线检测系统参数及测试
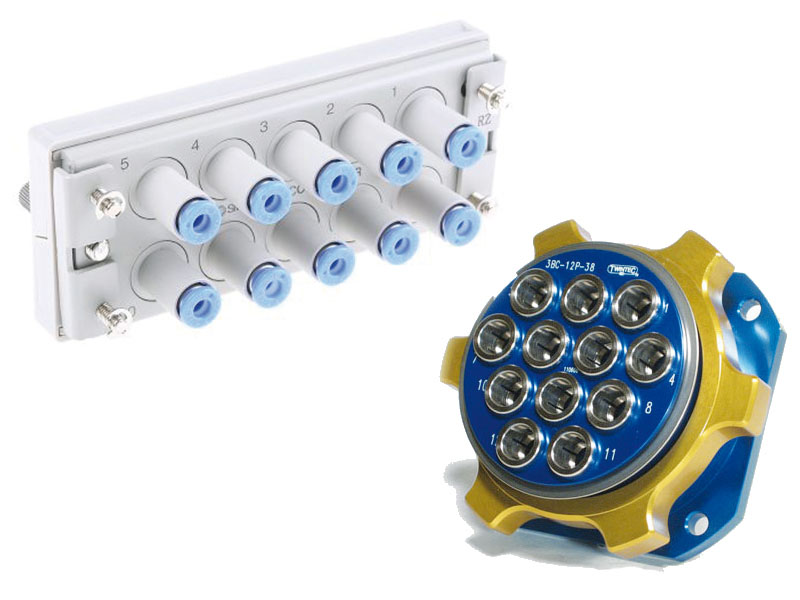
在线颗粒检测仪提供12芯通讯电缆和3芯的继电器信号电缆,为了满足不同场合和工况的需求,设备提供4-20mA电流信号或者0-5V电压信号两种连接方式,在汽车冲压线的设计中我们选择4-20mA的电流信号的连接方式。
具体的线缆颜色和连接定义如表1所示,连接定义后设备可以提供ISO7-22,NAS0-12级的检测级别,设备采用3个LED显示ISO 4406和 NAS1638代码,系统设置LED的触发顺序为:
当油液的测试代码低于其设定代码时,LED持续显示绿色;当油液的测试代码临界于设定代码时,LED闪烁方式显示绿色(提示用户系统预警);当油液的测试代码为设定代码+1代码时,LED持续显示红色;当油液的测试代码为设定代码+2及以上代码时,LED以闪烁方式显示红色;
继电器3芯电缆提供油液污染水平达到预设警戒水平时,继电器触发,从而开启或关闭外围设备,如本系统的旁路过滤系统。3芯电缆定义红色为常开、蓝色为常闭、白色为共线,接点容量为5A5-24Vdc。
系统可以提供电压和电流输出信号,电流信号与ISO和NAS代码对应如表2和表3。
表2 电流信号与ISO代码对应表
表3 电流信号与NAS代码对应表
汽车冲压系统关键保护的是工业伺服液压阀,系统设置固体颗粒的ISO代码的阈值分别为6μm为15和14μm 为11,该检测值可以有效保护液压系统的:工业伺服阀、柱塞泵、比例阀、流量控制阀、叶片泵、滑阀、液压缸、齿轮泵等。
4. 结论
汽车冲压线通过采用在线油液颗粒检测系统,有效的解决该系统目前采用的离线取样检测的不及时性、二次污染等问题,设备安装调试完成后,通过系统模拟测试、在线颗粒检测复检、预警测试,目前系统已经在线运行2年4个月,系统运行平稳且精准预警,节约了人力、物力成本和有效的降低系统污染造成的停机风险。该油液在线检测系统不仅可以在汽车冲压线使用,而且可以在非常多的油液检测场合推广使用。
参考文献
[1] 孙衍山,邓可.液压油在线污染度连续监测传感器研究[J].润滑与密封,2015,40(03):73-78.
[2] 王海军,张齐生,董彩云.液压油污染度在线监测系统研制及实验研究[J].液压与气动,2009(02):11-14.
[3] 王旭东, 一种汽车冲压线液压系统油液污染在线监测装置:ZL201821518918[P].2018-09-14
[4] 张庆良.液压油污染度的在线监测技术[J].液压与气动,2011(12):87-88.