Arduino Project 019 - LED Dot Matrix Display - Basic Animation
So far you have dealt with individual 5mm LEDs. LEDs can also be obtained in a package known as a dot matrix display, the most popular being a matrix of 8x8 LEDs or 64 LEDs in total. You can also obtain bicolor dot matrix displays (e.g. red and green) or even RGB dot matrix displays, which can display any color and contains a total of 192 LEDs in a single display package. In this chapter, you are going to deal with a standard single color 8x8 dot matrix display and show you how to display images and text. You will start off with a simple demonstration of creating an animated image on an 88 display and then move onto more complex display projects. Along the way, you will learn the very important concept of multiplexing.
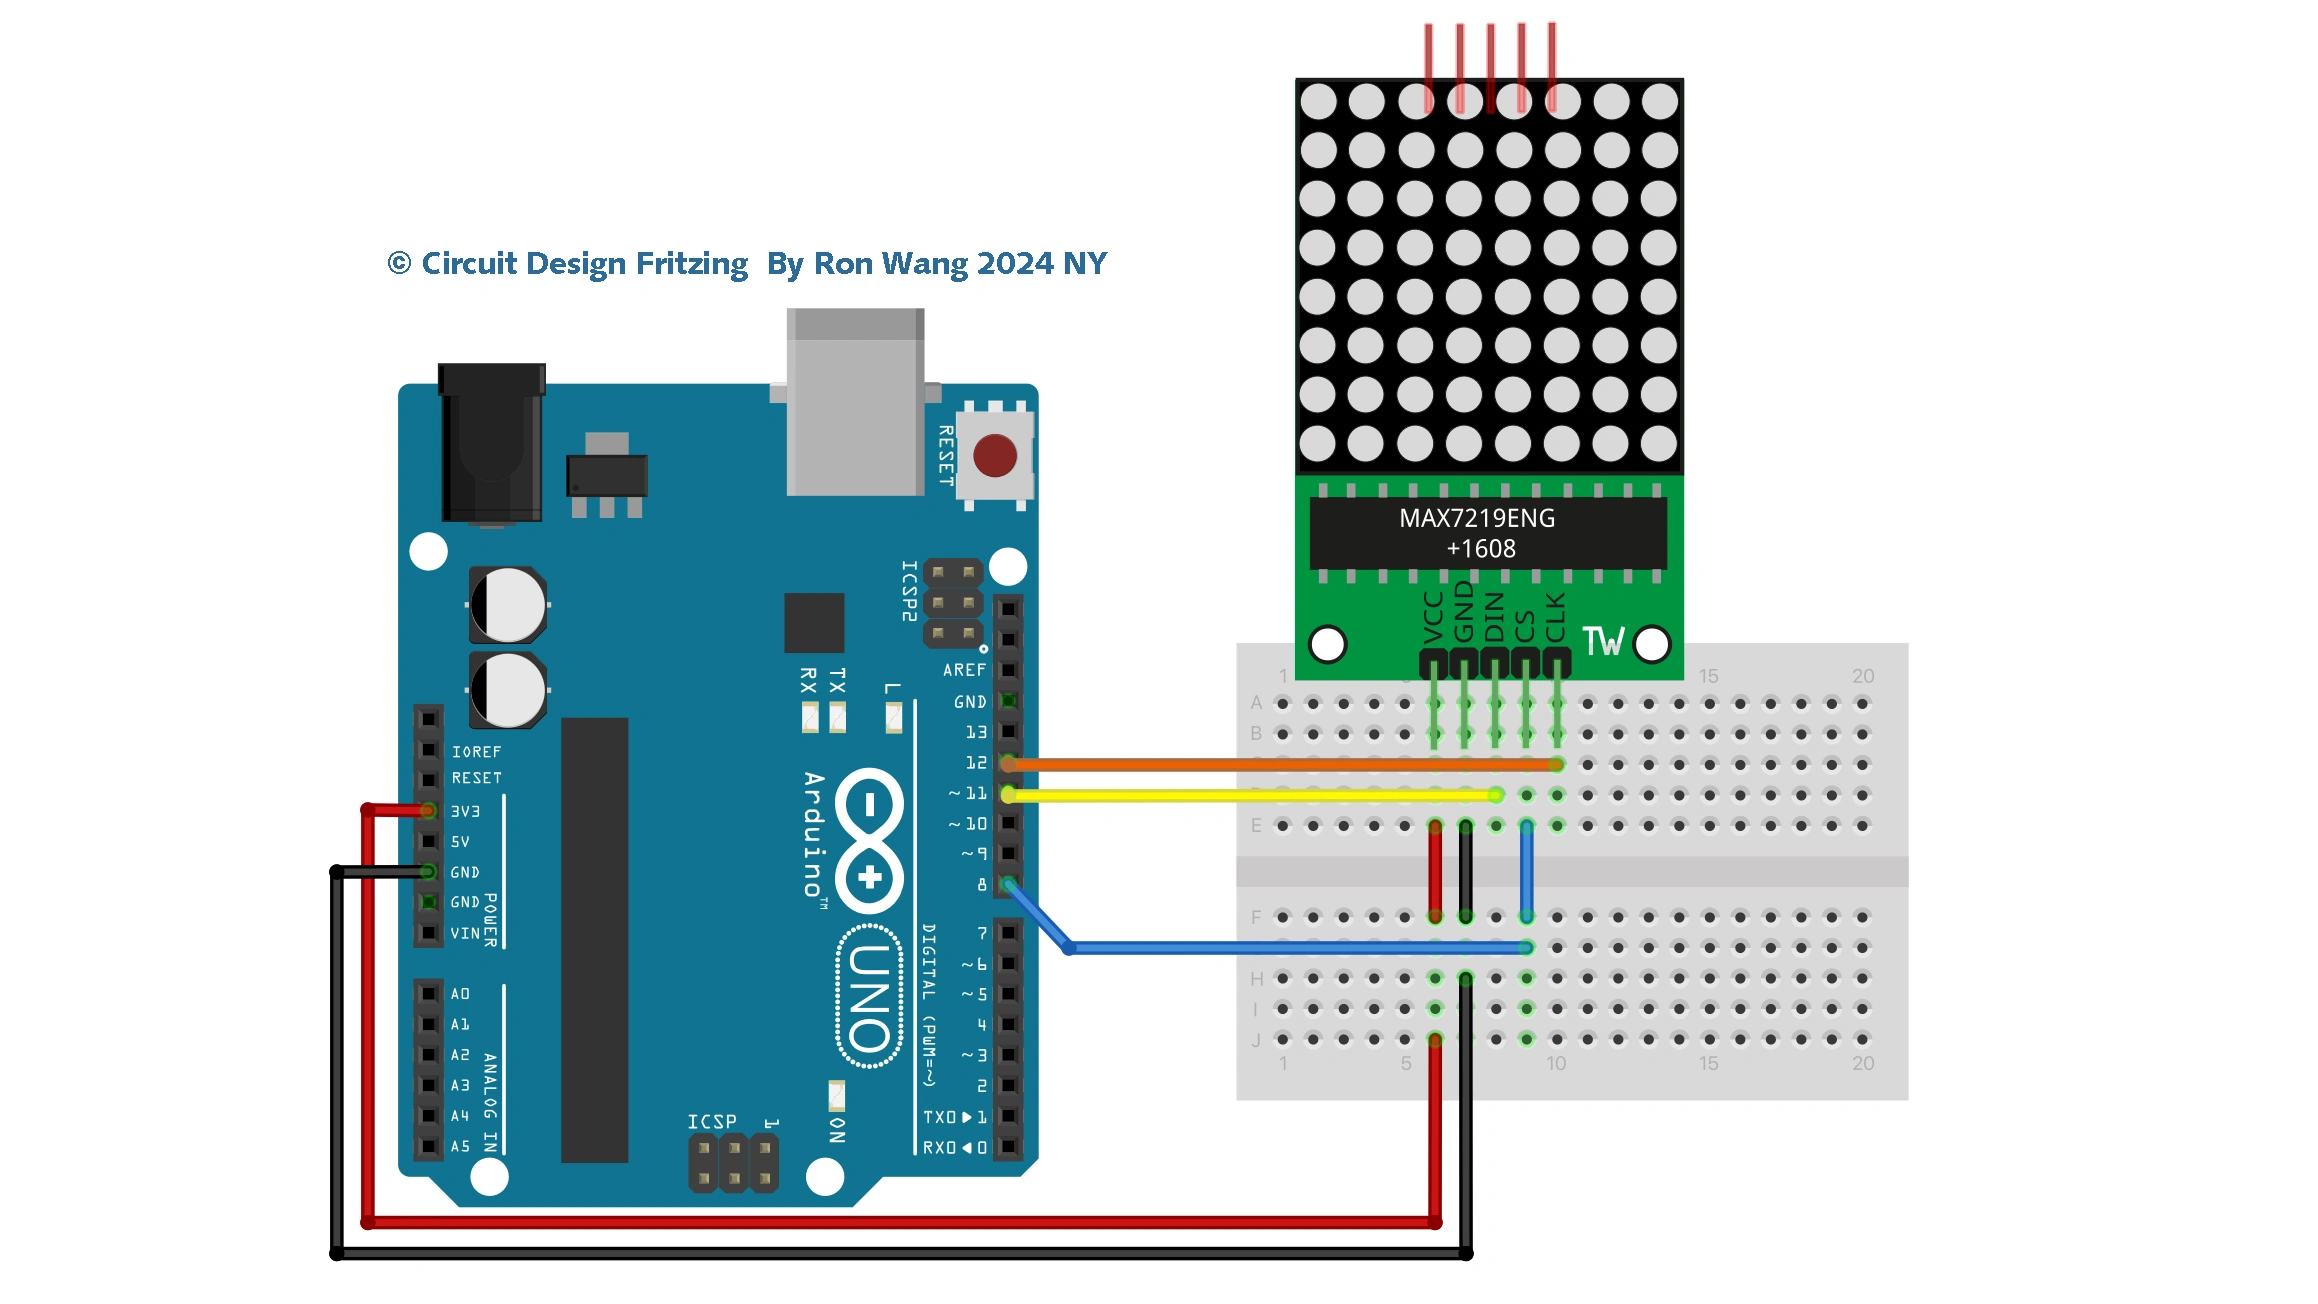
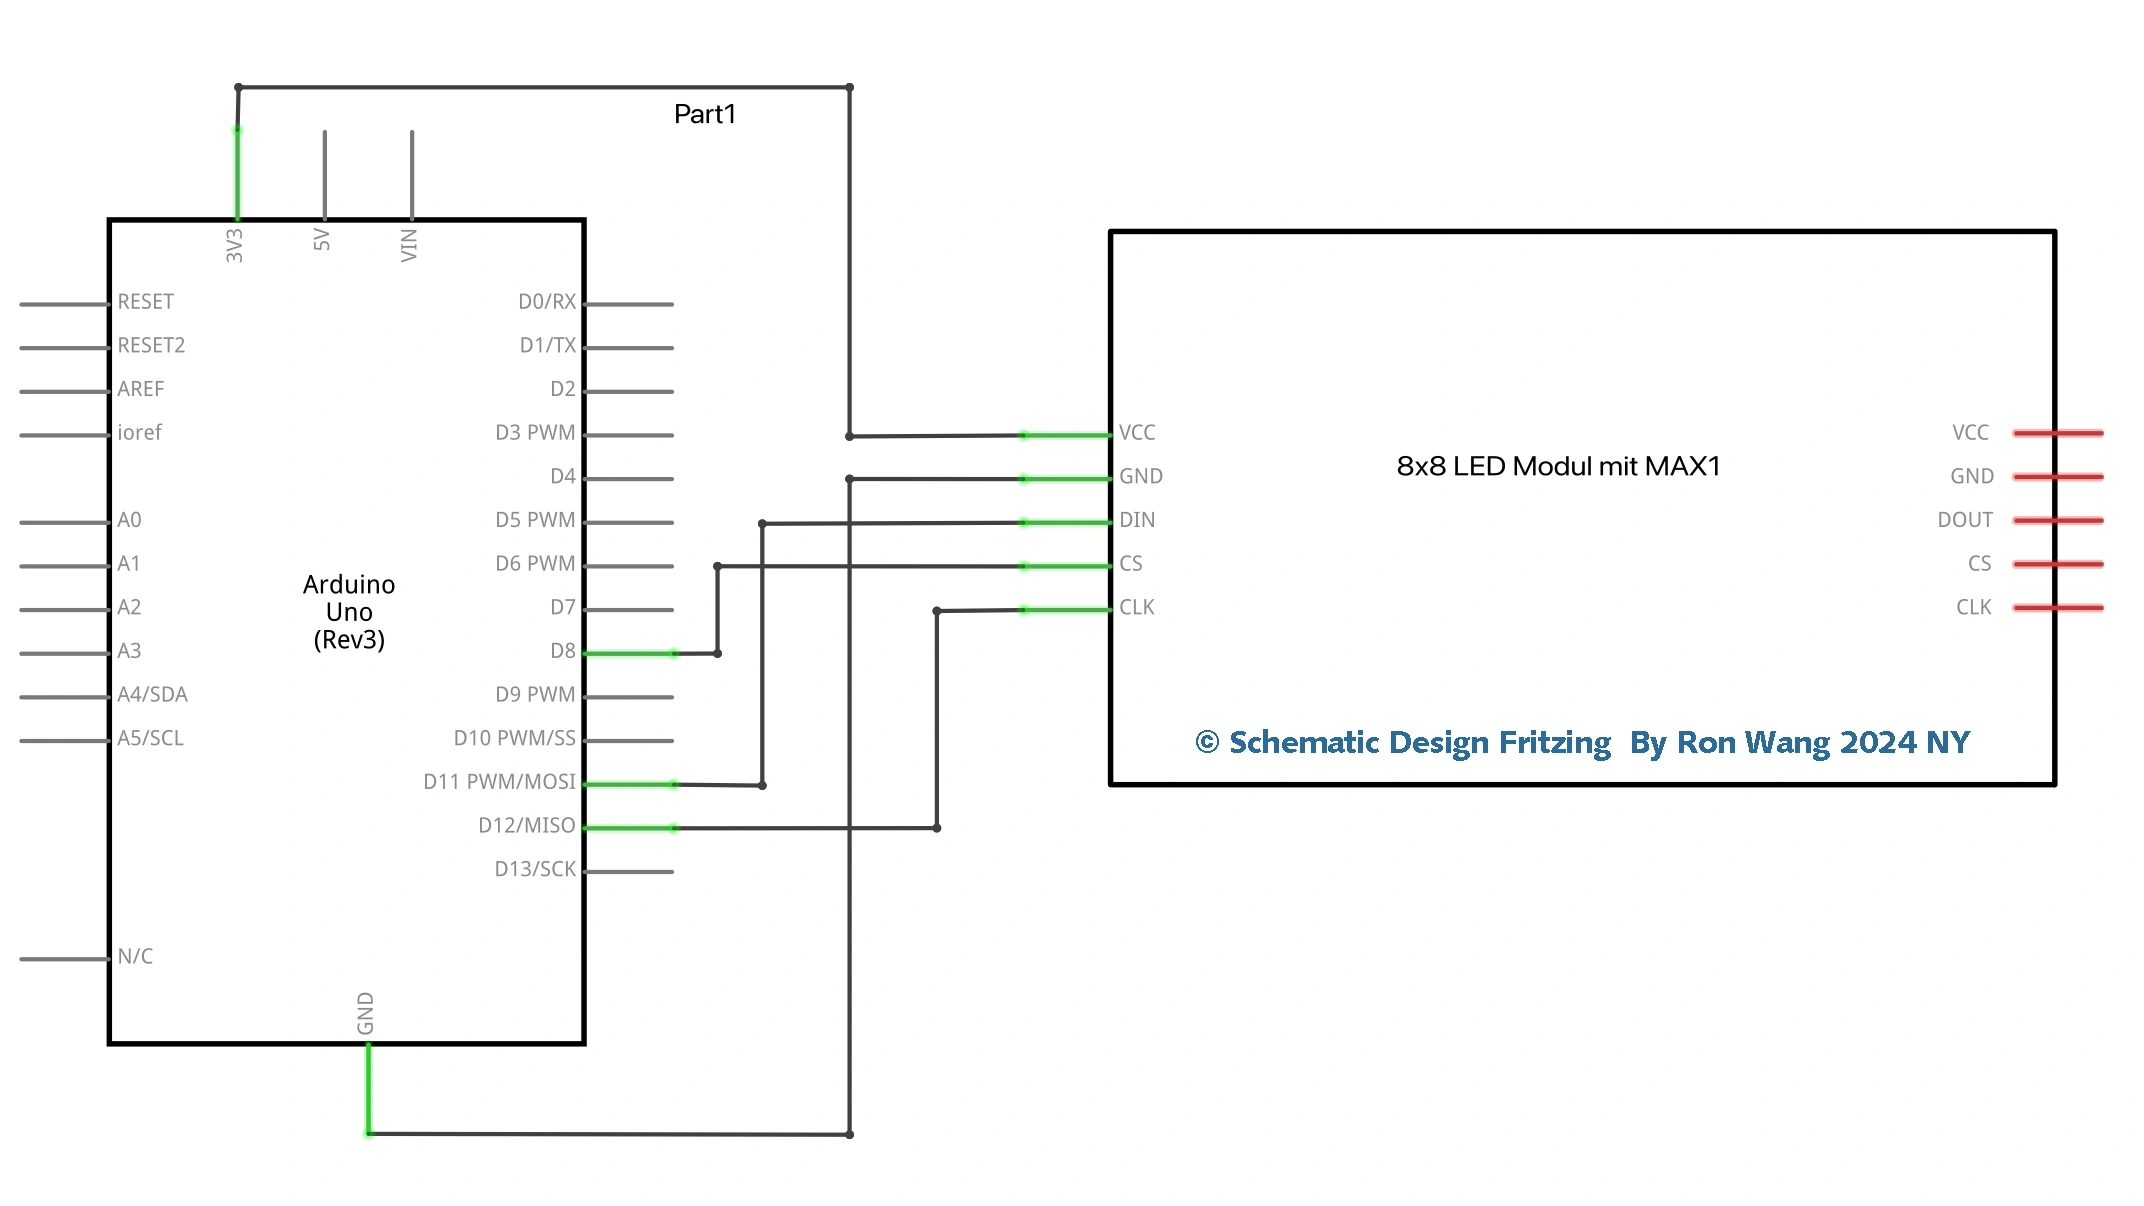
Project 19 – LED Dot Matrix Display – Basic Animation
/* Coding Ron Wang
   Sep.24th 2024
   Autaba support for coding hardware
   Project 19 LED Dot Matrix – Basic Animation
 */
#include <LedControl.h>
int DIN = 11;
int CS =  8;
int CLK = 12;
byte L[8]=     {0x7f,0x7f,0x7f,0x07,0x07,0x07,0x07,0x07};
byte dot[8]=   {0x18,0x18,0x00,0x00,0x00,0x00,0x00,0x00};
byte S[8]=     {0x7e,0x7e,0x60,0x7e,0x7e,0x06,0x7e,0x7e};
byte H[8]=     {0xe7,0xe7,0xe7,0xff,0xff,0xe7,0xe7,0xe7};
byte A[8]=     {0xe7,0xe7,0xff,0xff,0xe7,0xe7,0x7e,0x3c};
byte R[8]=     {0xc7,0xe7,0x7f,0x7f,0xe7,0xe7,0xff,0x7e};
byte T[8]=     {0x18,0x18,0x18,0x18,0x18,0x18,0xff,0xff};
LedControl lc=LedControl(DIN,CLK,CS,0);
void setup(){
 lc.shutdown(0,false);       //The MAX72XX is in power-saving mode on startup
 lc.setIntensity(0,15);      // Set the brightness to maximum value
 lc.clearDisplay(0);         // and clear the display
}
void loop(){
    byte smile[8]=   {0x3C,0x42,0xA5,0x81,0xA5,0x99,0x42,0x3C};
    byte neutral[8]= {0x3C,0x42,0xA5,0x81,0xBD,0x81,0x42,0x3C};
    byte frown[8]=   {0x3C,0x42,0xA5,0x81,0x99,0xA5,0x42,0x3C};

    printByte(smile);

    delay(1000);
    printByte(neutral);

    delay(1000);
    printByte(frown);
    delay(1000);

    printEduc8s();

    lc.clearDisplay(0);

    delay(1000);
}
void printEduc8s()
{
  printByte(L);
  delay(1000);
  printByte(dot);
  delay(1000);
  printByte(S);
  delay(1000);
  printByte(H);
  delay(1000);
  printByte(A);
  delay(1000);
  printByte(R);
  delay(1000);
    printByte(A);
  delay(1000);
  printByte(T);
  delay(1000);
  printByte(H);
  delay(1000);

}
void printByte(byte character [])
{
  int i = 0;
  for(i=0;i<9;i++)
  {
    lc.setRow(0,i,character[i]);
  }
}
版权声明:本文为原创文章,版权归donstudio所有,欢迎分享本文,转载请保留出处!


